images\cherry_red.png1 实训二前期LNMP简易架构
      images\cherry_blue.png1.1 php server安装
      images\cherry_blue.png1.2 安装初始化数据库
   images\cherry_red.png2 Mysql数据库
      images\cherry_blue.png2.1 Mysql5.7安装
         images\cherry_orange.png2.1.1 rpm安装
         images\cherry_orange.png2.1.2 yum安装
         images\cherry_orange.png2.1.3 源码安装
         images\cherry_orange.png2.1.4 编译好的非rpm包安装
         images\cherry_orange.png2.1.5 my.cnf常见选项
      images\cherry_blue.png2.2 Mysql基础
         images\cherry_orange.png2.2.1 MySql数据库操作
         images\cherry_orange.png2.2.2 MySql数据类型
            images\cherry_cyan.png2.2.2.1 整型
            images\cherry_cyan.png2.2.2.2 浮点数和定数
            images\cherry_cyan.png2.2.2.3 字符串类型
            images\cherry_cyan.png2.2.2.4 日期和时间类型
            images\cherry_cyan.png2.2.2.5 字段修饰和约束
            images\cherry_cyan.png2.2.2.6 业务建表练习
         images\cherry_orange.png2.2.3 MySql表操作
         images\cherry_orange.png2.2.4 MySql体系结构
         images\cherry_orange.png2.2.5 MySql存储引擎
      images\cherry_blue.png2.3 MySql操作
         images\cherry_orange.png2.3.1 MySql数据操作
         images\cherry_orange.png2.3.2 MySql单表查询
         images\cherry_orange.png2.3.3 MySql多表查询
         images\cherry_orange.png2.3.4 MySql存储过程与函数
      images\cherry_blue.png2.4 MySql操作-2
         images\cherry_orange.png2.4.1 MySql安全机制
         images\cherry_orange.png2.4.2 MySql日志管理
         images\cherry_orange.png2.4.3 MySql复制概述
         images\cherry_orange.png2.4.4 主从同步
      images\cherry_blue.png2.5 最基本sql语句及主从架构
      images\cherry_blue.png2.6 MyCat中间件
         images\cherry_orange.png2.6.1 部署Mycat
         images\cherry_orange.png2.6.2 配置读写分离
            images\cherry_cyan.png2.6.2.1 安全的读写分离
         images\cherry_orange.png2.6.3 XML语法格式
         images\cherry_orange.png2.6.4 mycat 分表分库
      images\cherry_blue.png2.7 Mysql MHA
         images\cherry_orange.png2.7.1 MHA-部署
         images\cherry_orange.png2.7.2 MHA-故障切换VIP透明
            images\cherry_cyan.png2.7.2.1 VIP切换脚本内容
            images\cherry_cyan.png2.7.2.2 VIP-手动在线切换脚本
         images\cherry_orange.png2.7.3 MHA+Mycat高可用Mysql读写分离
         images\cherry_orange.png2.7.4 MHA+VIP+Mycat
         images\cherry_orange.png2.7.5 MHA-故障切换邮件报警
         images\cherry_orange.png2.7.6 自动配置Slave主机
   images\cherry_red.png3 实验
      images\cherry_blue.png3.1 mysql授权问题
      images\cherry_blue.png3.2 1.单节点数据库
      images\cherry_blue.png3.3 2.主从同步
      images\cherry_blue.png3.4 3.实验(高可用)
         images\cherry_orange.png3.4.1 高可用keepalived
            images\cherry_cyan.png3.4.1.1 keepalived install
      images\cherry_blue.png3.5 4.实验(高可用+大并发)
         images\cherry_orange.png3.5.1 HAproxy代理
      images\cherry_blue.png3.6 4.实验(mycat-读写分离)
         images\cherry_orange.png3.6.1 mycat安装部署
         images\cherry_orange.png3.6.2 读写分离高可用
         images\cherry_orange.png3.6.3 mycat管理端口命令
      images\cherry_blue.png3.7 5.双主双从-读写分离-高可用
      images\cherry_blue.png3.8 6.mycat分库操作
      images\cherry_blue.png3.9 7.mycat分表
      images\cherry_blue.png3.10 8.mycat分库分表之下实现读写分离
   images\cherry_red.png4 Shell脚本编程
   images\cherry_red.png5 Zabbix监控
      images\cherry_blue.png5.1 zabbix设置邮件报警--自定义报警媒介
      images\cherry_blue.png5.2 zabbix解决中文界面乱码问题
      images\cherry_blue.png5.3 ziabbix自带的template Linux OS
      images\cherry_blue.png5.4 zabbix-agent自定义收集数据
      images\cherry_blue.png5.5 zabbix监控Nginx性能
      images\cherry_blue.png5.6 综合配置
      images\cherry_blue.png5.7 实验:监控nginx端口实现告警
   images\cherry_red.png6 ELK日志分析
      images\cherry_blue.png6.1 PS
      images\cherry_blue.png6.2 es-head插件安装
      images\cherry_blue.png6.3 安装filebeat nginx日志模板
zabbix监控nginx:
1.分析监控的指标?
2.实现数据采集脚本(程序)
3.配置zabbix-agent 自定义键(key)采集数据提交给zabbix-server 或者zabbix-proxy
4.zabbix-server 建立模板 及 监控项、触发器


=====================================================
1.配置nginx 虚拟主机的status
#vim /etc/nginx/conf.d/proxy.conf

location = /status {
stub_status on;
access_log off;
allow 192.168.182.1;
#一般只允许本机查询状态
allow 127.0.0.1;
deny all;
}

测试查询状态数据
[root@nginxproxy ~]# curl 127.0.0.1/status
Active connections: 1
server accepts handled requests
4 4 4
Reading: 0 Writing: 1 Waiting: 0

Active connections – 活跃的连接数量
server accepts handled requests — 总共处理了4个连接 , 成功创建4次握手, 总共处理了4个请求。
reading — 读取客户端的连接数。
writing — 响应数据到客户端的数量。
waiting — 开启 keep-alive 的情况下,这个值等于 active – (reading+writing), 意思就是 Nginx 已经处理完正在等候下一次请求指令的驻留连接


2.写nginx状态数据收集脚本
[root@web-proxy zabbix_agentd.d]# vi /etc/zabbix/zabbix_agentd.d/nginxStatu.sh
#! /bin/bash
#获取nginx status 各项值
#脚本的使用方法 /etc/zabbix/zabbix_agentd.d/nginxStatu.sh <给上对应的参数active|accepts|handled|requests|reading|writing|waiting >
string=$(curl -s http://127.0.0.1/status)

case $1 in
active)
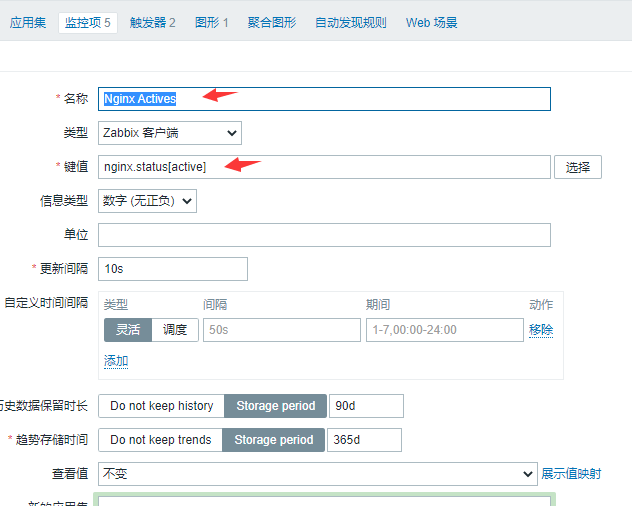
echo "${string}" | awk -F: 'NR==1 {print $2}'
;;
accepts)
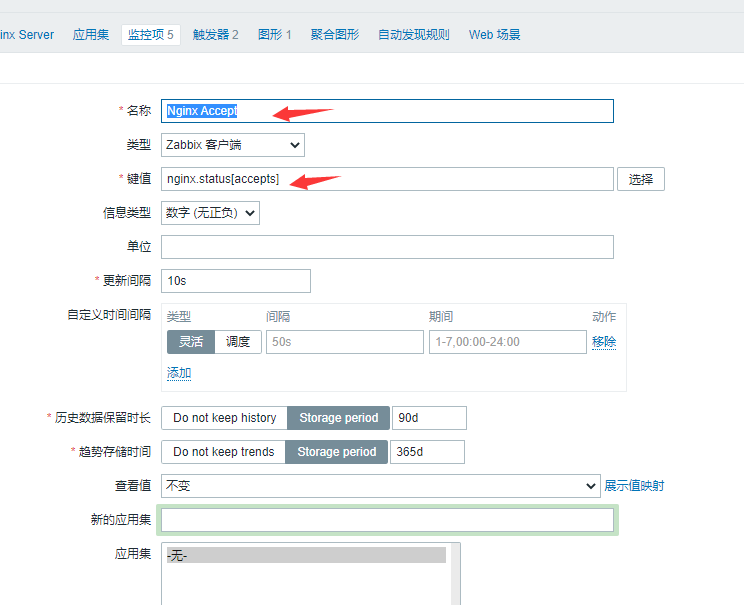
echo "${string}" | awk 'NR==3 {print $1}'
;;
handled)
echo "${string}" | awk 'NR==3 {print $2}'
;;
requests)
echo "${string}" | awk 'NR==3 {print $3}'
;;
reading)
echo "${string}" | awk 'NR==4 {print $2}'
;;
writing)
echo "${string}" | awk 'NR==4 {print $4}'
;;
waiting)
echo "${string}" | awk 'NR==4 {print $6}'
;;
*)
echo "use: nginxStatus.sh [active|accepts|handled|requests|reading|writing|waiting]"
;;

esac

exit 0
-----------------------------------------------------------------------------------------------------------------
[root@web-proxy zabbix_agentd.d]# chmod a+x /etc/zabbix/zabbix_agentd.d/ginxStatu.sh


3.自定义zabbix-agent 相应键
[root@nginxproxy ~]# vi /etc/zabbix/zabbix_agentd.d/systemInfo.conf
UserParameter=nginx.status[*],/etc/zabbix/zabbix_agentd.d/nginxStatu.sh $1

4.重启zabbix-agent
# systemctl restart zabbix-agent

5.通过zabbix_get命令测试是否正常
[root@zabbixserver ~]# zabbix_get -s192.168.182.99 -p10050 -k"nginx.status[activ]"
use: nginxStatus.sh [active|accepts|handled|requests|reading|writing|waiting]

[root@zabbixserver ~]# zabbix_get -s192.168.182.99 -p10050 -k"nginx.status[active]"
1
[root@zabbixserver ~]# zabbix_get -s192.168.182.99 -p10050 -k"nginx.status[writing]"
1
[root@zabbixserver ~]# zabbix_get -s192.168.182.99 -p10050 -k"nginx.status[reading]"
0


6.在zabbix-server 对应的主机 或 模板 添加 各项监控项 及 触发器
images\72-1.png


images\72-2.png


=================================================
http 压力测试命令:
[root@localhost ~]# which ab
/usr/bin/ab
[root@localhost ~]# rpm -qf /usr/bin/ab
httpd-tools-2.4.6-93.el7.centos.x86_64

-c 指定并发数 -n 指定请求次数
[root@localhost ~]#ab -c100 -n100 http://192.168.110.99/index.php