 |
==========================================================
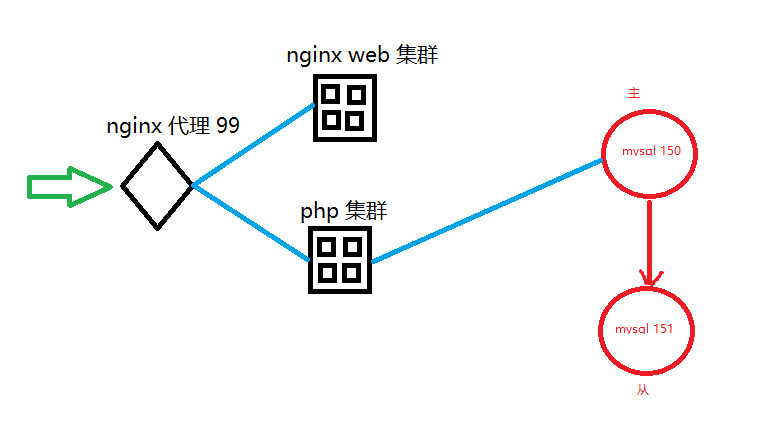
解决实验1 架构的 容灾性问题
缺点:
承载业务的依然为150服务器,因此依然会出现单机故障业务瘫痪,对于并发依然没有任何提高
==========================================================
主从配置:
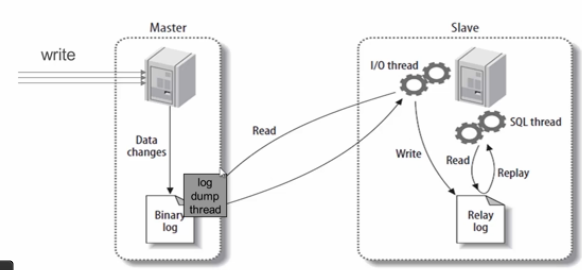
主从同步原理:
在主服务器上开启二进制日志,之后当主库执行更改数据的sql语句将记录在二进制日志中。
在从库中指定主库的信息并启动从功能,此时从服务器将建立两个线程:一个IO线程与主
服务器连接监听主服务器的二进制日志是否发生变化,如果有发生变化则将变化部分日志内
容传输到从服务器并记录在中继日志中,另一个sql线程则负责将中继日志中的sql语句在从数据库中执行
 |
在主从配置之前必须保证从库数据与主库数据一致,否则很可能在 主从同步后操作过程中出现错误。
通过备份主库在从库上恢复达到数据一致性:
备份destoon库
mysqldump -uroot -pUplooking_123 -B destoon > /home/my.sql
备份destoon mysql stu 三个库
mysqldump -uroot -pUplooking_123 -B destoon mysql stu > /home/my.sql
备份所有库
mysqldump -uroot -pUplooking_123 -B -A > /home/my.sql
通过/home/my.sql备份文件恢复数据库
mysqldump -uroot -pUplooking_123 < /home/my.sql
步骤:(主库150 从库151)
主库操作:
1.备份主库
mysqldump -uroot -pUplooking_123 -B -A > /home/master_fully.sql
2.进入主库授权一个用户 给与从库连接主库 监听主库的二进制日志的变化
mysql> GRANT REPLICATION SLAVE on *.* to 'sync'@'192.168.182.%' identified by 'Uplooking_123';
Query OK, 0 rows affected, 1 warning (0.23 sec)
mysql> flush privileges;
Query OK, 0 rows affected (0.15 sec)
mysql> select user,host from mysql.user;
+------+---------------+
| user | host |
+------+---------------+
| gkd | 192.168.182.% |
| sync | 192.168.182.% |
| root | localhost |
+------+---------------+
3 rows in set (0.00 sec)
3.配置主配置文件/etc/my.cnf 开启二进制日志
skip-name-resolve
query_cache_type=OFF
server-id=1
log_bin=/var/lib/mysql/master_bin
忽略某些库布进行同步
binlog-ignore-db=performance_schema
binlog-ignore-db=mysql
binlog-ignore-db=sys
重启数据服务,开启二进制日志,之后主库所有的变更操作都会记录到二进制日志中
systemctl restart mysqld
4.查看主的开启状态
# mysql -uroot -pUplooking_123
mysql> show master status; ------查询主的开启状态,只要能看到以下信息,并且同步用的授权用户已经授权,则主服务器mysql无需做任何更改
+-------------------+----------+--------------+------------------------------+-------------------+
| File | Position | Binlog_Do_DB | Binlog_Ignore_DB | Executed_Gtid_Set |
+-------------------+----------+--------------+------------------------------+-------------------+
| master_bin.000001 | 154 | | performance_schema,mysql,sys | |
+-------------------+----------+--------------+------------------------------+-------------------+
1 row in set (0.00 sec)
mysql> select user,host from mysql.user;
+------+---------------+
| user | host |
+------+---------------+
| gkd | 192.168.182.% |
| sync | 192.168.182.% |
| root | localhost |
+------+---------------+
查看具体的授权信息
mysql> show grants for 'sync'@'192.168.182.%';
+----------------------------------------------------------+
| Grants for sync@192.168.182.% |
+----------------------------------------------------------+
| GRANT REPLICATION SLAVE ON *.* TO 'sync'@'192.168.182.%' |
+----------------------------------------------------------+
1 row in set (0.01 sec)
mysql> flush tables with read lock; ------锁定主库,防止在同步之前或过程中有新的数据写入
Query OK, 0 rows affected (0.00 sec)
==================================================================
从库库配置:
1.用主库的备份进行恢复,从而达到从库与主库现在的数据一致性
[root@dn2 ~]# cd /tmp/
从主库远程拷贝备份文件
[root@dn2 tmp]# scp 192.168.182.150:/home/master_fully.sql ./
Are you sure you want to continue connecting (yes/no)? yes
Warning: Permanently added '192.168.182.150' (ECDSA) to the list of known hosts.
root@192.168.182.150's password: ----输入192.168.182.150系统root用户的登陆密码,老师的当前为123456
master_fully.sql
100% 1088KB 4.4MB/s 00:00
[root@dn2 tmp]# ls /tmp/master_fully.sql
/tmp/master_fully.sql
通过备份恢复
[root@dn2 tmp]# mysql -uroot -pUplooking_123 < /tmp/master_fully.sql
查看是否数据库一致
[root@dn2 tmp]# mysql -uroot -pUplooking_123 -e "show databases;"
mysql: [Warning] Using a password on the command line interface can be insecure.
+--------------------+
| Database |
+--------------------+
| information_schema |
| destoon |
| mysql |
| performance_schema |
| sys |
+--------------------+
2.修改从库的配置文件(设置唯一的server-id)
vi /etc/my.cnf
skip-name-resolve
query_cache_type=OFF
server-id=2
relay-log=/var/lib/mysql.relay-log -----如果不指定,会用默认文件名
重启数据库服务
systemctl restart mysqld
systemctl enable mysqld
3.进入数据库,通过sql语句指定自己的主服务器
#mysql -uroot -pUplooking_123
mysql> change master to master_host='192.168.182.150',
-> master_user='sync',
-> master_password='Uplooking_123',
-> master_log_file='master_bin.000001',
-> master_log_pos=154;
启动从机制
mysql> start slave;
Query OK, 0 rows affected (0.01 sec)
mysql> show slave status\G
*************************** 1. row ***************************
Slave_IO_State: Waiting for master to send event
Master_Host: 192.168.182.150
Master_User: sync
Master_Port: 3306
Connect_Retry: 60
Master_Log_File: master_bin.000001
Read_Master_Log_Pos: 154
Relay_Log_File: relay-log.000002
Relay_Log_Pos: 321
Relay_Master_Log_File: master_bin.000001
Slave_IO_Running: Yes
Slave_SQL_Running: Yes
=========================================
注意:
1.双方防火墙机制是否屏蔽
2.解锁主库:
mysql> unlock tables;
3.测试 :在主库上 建库 建表 进行增删改查 查看 从库是否跟随主库的操作
4.从库的命令:
change master to ....... ----指定主库是谁
start slave; ----启动从机制
stop slave; ----停止从机制
reset slave all; ----重置从的配置
show slave status\G ----查看从状态
!!!!!!!!!!!!!!!!!!!!在主从同步机制下,实现临时关闭二进制日志,有意识的进行一些必要的同步操作
mysql> show master status;
+-------------------+----------+--------------+------------------------------+-------------------+
| File | Position | Binlog_Do_DB | Binlog_Ignore_DB | Executed_Gtid_Set |
+-------------------+----------+--------------+------------------------------+-------------------+
| master-bin.000002 | 1386 | | performance_schema,mysql,sys | |
+-------------------+----------+--------------+------------------------------+-------------------+
1 row in set (0.00 sec)
mysql> create database tt;
Query OK, 1 row affected (0.01 sec)
mysql> show master status;
+-------------------+----------+--------------+------------------------------+-------------------+
| File | Position | Binlog_Do_DB | Binlog_Ignore_DB | Executed_Gtid_Set |
+-------------------+----------+--------------+------------------------------+-------------------+
| master-bin.000002 | 1540 | | performance_schema,mysql,sys | |
+-------------------+----------+--------------+------------------------------+-------------------+
1 row in set (0.00 sec)
mysql> set sql_log_bin=0;
Query OK, 0 rows affected (0.00 sec)
mysql> drop database tt;
Query OK, 0 rows affected (0.00 sec)
mysql> show master status;
+-------------------+----------+--------------+------------------------------+-------------------+
| File | Position | Binlog_Do_DB | Binlog_Ignore_DB | Executed_Gtid_Set |
+-------------------+----------+--------------+------------------------------+-------------------+
| master-bin.000002 | 1540 | | performance_schema,mysql,sys | |
+-------------------+----------+--------------+------------------------------+-------------------+
1 row in set (0.00 sec)
mysql> set sql_log_bin=1;