images\cherry_red.png1 实训二前期LNMP简易架构
      images\cherry_blue.png1.1 php server安装
      images\cherry_blue.png1.2 安装初始化数据库
   images\cherry_red.png2 Mysql数据库
      images\cherry_blue.png2.1 Mysql5.7安装
         images\cherry_orange.png2.1.1 rpm安装
         images\cherry_orange.png2.1.2 yum安装
         images\cherry_orange.png2.1.3 源码安装
         images\cherry_orange.png2.1.4 编译好的非rpm包安装
         images\cherry_orange.png2.1.5 my.cnf常见选项
      images\cherry_blue.png2.2 Mysql基础
         images\cherry_orange.png2.2.1 MySql数据库操作
         images\cherry_orange.png2.2.2 MySql数据类型
            images\cherry_cyan.png2.2.2.1 整型
            images\cherry_cyan.png2.2.2.2 浮点数和定数
            images\cherry_cyan.png2.2.2.3 字符串类型
            images\cherry_cyan.png2.2.2.4 日期和时间类型
            images\cherry_cyan.png2.2.2.5 字段修饰和约束
            images\cherry_cyan.png2.2.2.6 业务建表练习
         images\cherry_orange.png2.2.3 MySql表操作
         images\cherry_orange.png2.2.4 MySql体系结构
         images\cherry_orange.png2.2.5 MySql存储引擎
      images\cherry_blue.png2.3 MySql操作
         images\cherry_orange.png2.3.1 MySql数据操作
         images\cherry_orange.png2.3.2 MySql单表查询
         images\cherry_orange.png2.3.3 MySql多表查询
         images\cherry_orange.png2.3.4 MySql存储过程与函数
      images\cherry_blue.png2.4 MySql操作-2
         images\cherry_orange.png2.4.1 MySql安全机制
         images\cherry_orange.png2.4.2 MySql日志管理
         images\cherry_orange.png2.4.3 MySql复制概述
         images\cherry_orange.png2.4.4 主从同步
      images\cherry_blue.png2.5 最基本sql语句及主从架构
      images\cherry_blue.png2.6 MyCat中间件
         images\cherry_orange.png2.6.1 部署Mycat
         images\cherry_orange.png2.6.2 配置读写分离
            images\cherry_cyan.png2.6.2.1 安全的读写分离
         images\cherry_orange.png2.6.3 XML语法格式
         images\cherry_orange.png2.6.4 mycat 分表分库
      images\cherry_blue.png2.7 Mysql MHA
         images\cherry_orange.png2.7.1 MHA-部署
         images\cherry_orange.png2.7.2 MHA-故障切换VIP透明
            images\cherry_cyan.png2.7.2.1 VIP切换脚本内容
            images\cherry_cyan.png2.7.2.2 VIP-手动在线切换脚本
         images\cherry_orange.png2.7.3 MHA+Mycat高可用Mysql读写分离
         images\cherry_orange.png2.7.4 MHA+VIP+Mycat
         images\cherry_orange.png2.7.5 MHA-故障切换邮件报警
         images\cherry_orange.png2.7.6 自动配置Slave主机
   images\cherry_red.png3 实验
      images\cherry_blue.png3.1 mysql授权问题
      images\cherry_blue.png3.2 1.单节点数据库
      images\cherry_blue.png3.3 2.主从同步
      images\cherry_blue.png3.4 3.实验(高可用)
         images\cherry_orange.png3.4.1 高可用keepalived
            images\cherry_cyan.png3.4.1.1 keepalived install
      images\cherry_blue.png3.5 4.实验(高可用+大并发)
         images\cherry_orange.png3.5.1 HAproxy代理
      images\cherry_blue.png3.6 4.实验(mycat-读写分离)
         images\cherry_orange.png3.6.1 mycat安装部署
         images\cherry_orange.png3.6.2 读写分离高可用
         images\cherry_orange.png3.6.3 mycat管理端口命令
      images\cherry_blue.png3.7 5.双主双从-读写分离-高可用
      images\cherry_blue.png3.8 6.mycat分库操作
      images\cherry_blue.png3.9 7.mycat分表
      images\cherry_blue.png3.10 8.mycat分库分表之下实现读写分离
   images\cherry_red.png4 Shell脚本编程
   images\cherry_red.png5 Zabbix监控
      images\cherry_blue.png5.1 zabbix设置邮件报警--自定义报警媒介
      images\cherry_blue.png5.2 zabbix解决中文界面乱码问题
      images\cherry_blue.png5.3 ziabbix自带的template Linux OS
      images\cherry_blue.png5.4 zabbix-agent自定义收集数据
      images\cherry_blue.png5.5 zabbix监控Nginx性能
      images\cherry_blue.png5.6 综合配置
      images\cherry_blue.png5.7 实验:监控nginx端口实现告警
   images\cherry_red.png6 ELK日志分析
      images\cherry_blue.png6.1 PS
      images\cherry_blue.png6.2 es-head插件安装
      images\cherry_blue.png6.3 安装filebeat nginx日志模板

images\55-1.png


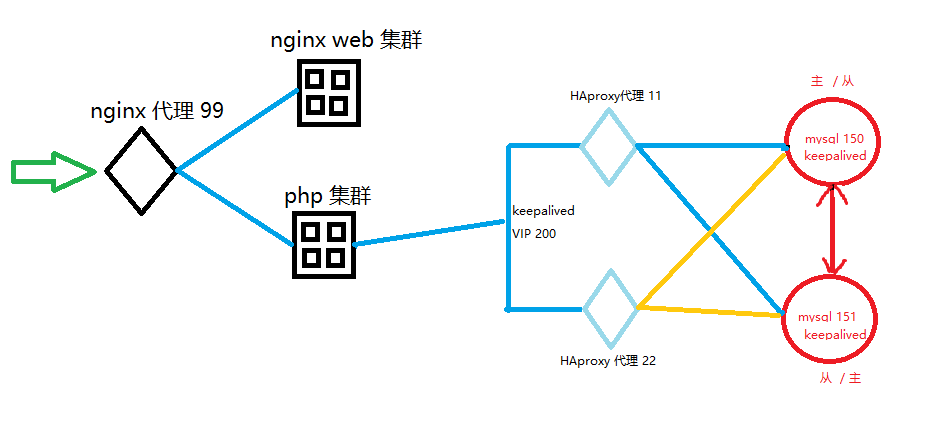
在实验3基础之上 加入haproxy数据库代理实现数据库的高可用与提高并发,代理实际应用中为确保高可用将会采用2台haproxy服务器用keepalived实现高可用机制,
实验时可先实现一台haproxy代理数据库,体验数据库代理负载均衡的效果
=========================================================
部署HAproxy

1.计划一台用与作为haproxy代理的服务器

2.安装
yum install -y haproxy

/etc/haproxy/haproxy.cfg


3.配置代理
# vi /etc/haproxy/haproxy.cfg
global
log 127.0.0.1 local2

chroot /var/lib/haproxy
pidfile /var/run/haproxy.pid
maxconn 4000
user haproxy
group haproxy
daemon

# turn on stats unix socket
stats socket /var/lib/haproxy/stats

#---------------------------------------------------------------------
# common defaults that all the 'listen' and 'backend' sections will
# use if not designated in their block
#---------------------------------------------------------------------
defaults
mode tcp
log global
option
httplog
option dontlognull
option
http-server-close
option forwardfor except 127.0.0.0/8
option redispatch
retries 3
timeout
http-request 10s
timeout queue 1m
timeout connect 10s
timeout client 1m
timeout server 1m
timeout
http-keep-alive 10s
timeout check 10s
maxconn 3000

#---------------------------------------------------------------------
# main frontend which proxys to the backends
#---------------------------------------------------------------------
#指定mysql 集群
listen mysql
#指定当前haproxy服务监听地址 0.0.0.0.0代表本机的所有IP, 3306为haproxy绑定的端口
bind 0.0.0.0:3306
#数据库代理需要实现 4层TCP端口代理,
mode tcp
#轮询负载算法 roundrobin轮询 least_conn最少连接 source根据源地址,类似与ip_hash
balance roundrobin
#msql1 自定义的后台服务器名 192.168.182.150:3306实际的后台服务地址及端口
#check port 3306进行mysql服务器的健康检查,如不写haproxy默认为健康的 maxconn 300指定最大连接数
server mysql1 192.168.182.150:3306 check port 3306 maxconn 3000
server mysql2 192.168.182.151:3306 check port 3306 maxconn 3000

#开启haproxy再带的监控功能
listen status
bind 0.0.0.0:8080
mode
http
#默认持久连接超时时间
timeout
http-keep-alive 30s
#心跳检测超时
timeout check 10s
# 继承global中log的定义
log global
# stats是haproxy的一个统计页面的套接字,该参数设置统计页面的刷新间隔为30s
stats refresh 30s
# 设置统计页面的uri为/status
stats uri /status
# 设置统计页面认证时的提示内容
stats realm Private lands
# 设置统计页面认证的用户和密码,如果要设置多个,另起一行写入即可
stats auth admin:123456
# 隐藏统计页面上的haproxy版本信息
stats hide-version

=================================================================

测试:
#select @@hostname as hostname 用sql查询数据库服务器的主机名

admin 为数据库上授权可远程连接的用户 192.168.182.11 为代理服务器
#如果执行下面语句能看到不同的后台数据库主机名,说明代理负载均衡有效
mysql -uadmin -pUplooking_123 -h192.168.182.11 -e "select @@hostname as hostname;"

思考:
1.该架构,数据库如何连接业务
2.尝试实现架构数据库代理的高可用